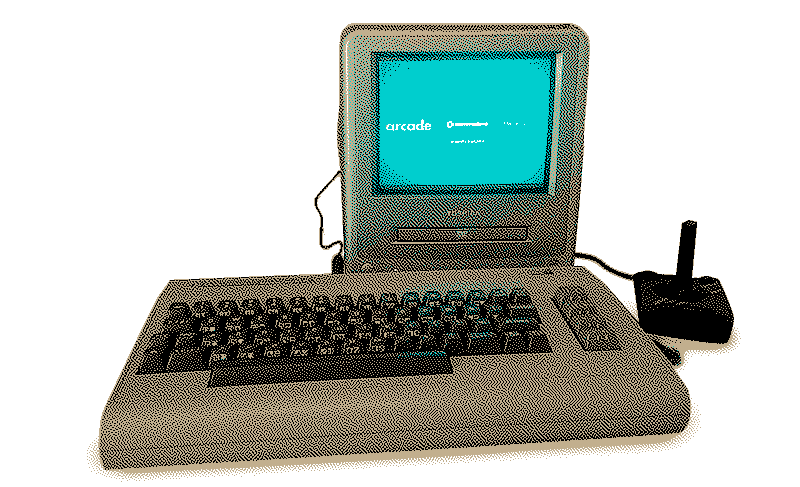
The Commodore 314. a raspberry pi inside a dead C64 breadbin.
Commodore 314 is a custom 80s & 90s emulation machine. It's a Raspberry Pi 3B+ with a bunch of adapters and some custom designed 3d printed parts inside an original Commodore 64 case. It runs RetroPie and BMC64, can output to both composite and HDMI and uses the built-in C64 keyboard, USB peripherals and Atari compatible joysticks as input. No vintage hardware was harmed during making of this project.
Yet another pi inside C64? #
Placing Pis in inside Commodore cases is by no means a new idea, but this is a big reason why I have chosen it to be my first real hardware project. I am (still) not much of a hardware guy and being able to reference multiple examples of finished projects was the safety net I needed to actually give a hardware project a try.
Also, I really wanted to build my own happy, beige nostalgia box. Commodore64 was my first computer, and while I was way too young to actually do anything with it (I was 4 or 5), it still left an impression and holds a special place in my heart. Then, once I got a Pentium PC in my teens, I got hooked on emulation (first time I was online, was to research it) and have many fond memories of discovering unknown, to me, systems. Combining the two memories seemed like a no brainer.
Building the machine #
The two main goals for this project was to have a fully working keyboard, and for the case mod to be non-destructive and fully reversible (in case I manage to fix the broken C64 motherboard that came with it… also it looks nicer that way).
The first goal was solved surprisingly easily. I found Keyrah - an interface board that lets you connect the C64 keyboard and DB9 ports to USB. It has its issues (more on that later), but it is a solid, ready-made solution.
The second goal was a bit more tricky, as I wanted particular ports (RCA!) on the back of the case. In the end, I opted for designing my own 3d printable brackets that give me the ports I want and fit neatly inside using the existing motherboard mounting points. I have based them of an existing design, but took the opportunity to learn Fusion360 and built them from scratch. They are available on thingiverse.
The build itself is rather simple. Remove the c64 motherboard and snap the brackets in its place. Install the raspi and Keyrah onto the brackets, connect everything with bunch of cables and you're done! In the end I used the following parts:
- Broken C64 - the original breadbin model, motherboard removed.
- Raspberry Pi - the new brains.
- 3d printed brackets - for mounting the parts inside the case.
- Keyrah V2 - keyboard and DB9 to USB interface.
- 2x 6" USB male to female cables - for controllers & other USB devices.
- 6" mciroUSB male to female cable - for raspi power supply.
- 6" HDMI male to female cable - for modern display.
- Audio jack to RCA - for composite display. The right one is tricky to find!
- 3x female to female RCA couplers.
- Donor USB cable for connecting Keyrah internally.
I originally installed a powered USB hub with some velcro to act as the power supply, but it ended underpowering the pi after I spliced the power cable, so it was removed.
Tricky bits #
I have run into couple speed bumps along the way, mostly with things I haven't seen discussed in similar projects (so I didn't have a blueprint to follow). I am documenting them here, in case someone will find them helpful.
Composite output: I used to play NES (well, a famiclone) on a tiny CRT and wanted to revisit those memories. Raspi can output to RCA over its 3.5mm jack connector, the issue is there are multiple wiring schemes for such connector. You want the one that matches iPod video / Zune wiring. The only short cable of this kind I found, was the one included with the (now defunct ☹) CHIP computer.
Internal keyboard connection: Keyrah's default connector is an external USB type B to connect the C64 as a PC keyboard. Fortunately, there are 4 hidden holes under a sticker just behind the USB connector to connect it internally. I used an old USB charging cable and spliced four wire pins. If you don't want to solder, you can just grab an USB to 4 pin cable and plop it there for the same effect.
Arrow keys: Commodore64 has only two arrow keys - down and right. On a C64 using them with shift produces the opposite direction. Keyrah does not have this function. I managed to enable this behavior in bash and X by modifying the debian keyboard file. I was unable to do the same for EmulationStation, as it is based on SDL and uses its own, inaccessible, keyboard map.
Possible improvements #
While the C314 is working well as is, no project is ever truly finished. I have few ideas for improvements I would like to add to it somewhere down the line.
Power button: Right now the C314 powers on when the microUSB is connected, and is shutdown from a menu. It works ok, but it would be nice to have a power switch that can also do safe shutdown. It would require printing a new bracket with opening for the new button and something like PowerBlock to handle safe shutdown.
New keyboard controller: Keyrah is fine for a "plug-and-play" product, but it has its limitations. I would like to install a custom keyboard controller where I can program my own key combinations and get the arrows and other shifted key functions work on a hardware level. Making one with Arduino seems feasible.
New DB9 controller: Removing Keyrah as the keyboard controller means I would lose the DB9 connectors. Adding some DB9 to USB connectors in its place would also give ability to use all the buttons on Mega Drive / Genesis gamepad, as Keyrah is limited to only use a single "fire" button.
Helpful links #
- Ready made c64 to usb interfaces: Keyrah, Tynemouth Software
- 3d printable brackets: mine, other free and ready made from COREi64
- Good Pi-inside-C64 build writeups from Breadbox64 and GeekPub.
- Operating systems for your C64 Pi: RetroPie and BMC64